Fix: No Sound / On-Board Sound disabled after installing new Video Card with HDMI

This was a frustrating error that I found numerous possible fixes to on-line on various forums which involved installing the latest nightly builds and completely flushing out my drivers and rebuilding them. None of this worked, which led to hours of frustration. Finally, I tried a very old fix that I used to use for Sound Blaster (dating myself here…) back in the 90’s to get the games Doom or DukeNukem to load properly.


This fix will require you to know a little bit about CMOS and BIOS and is designed to fix the HDMI on the video card from over-riding the onboard sound.

1. Boot up into your BIOS – This is usually the F1 / DEL / F2 Key on first starting the computer.

2. Locate the Advanced tab for your PCI card settings, you are looking for the Interrupt settings which will be a list of features with assigned “IRQ”‘s next to them. Every system has these.

3. Locate the HDMI Sound Interrupt – Regardless of the value for the IRQ, set it to disabled.

4. Once its disabled, Save the changes to BIOS and reboot. Once the system starts you should have your On-Board sound again.

The issue is occurring because it appears that the HDMI on the video card is grabbing the interrupt for the on-board sound system and overriding it on every start up. I have tested this on Windows 10 and Ubuntu 14.04, 16.04 and 18.04 for Nvidia brand cards. Once the above change was made everything works well.

Trimble device will not connect in Windows 10

Symptoms:  A Trimble device or similar rugged handheld device that was working fine with Windows 10 may suddenly stop working and no longer be able to connect to the computer. This is a known issue associated with the Windows 10 version 1703 (Creators Update) Build 15063.  On an attempt to sync the device the software will state that its unable to connect or just fail.

The credit here goes to Junipersys.com for identifying the fix for this frustrating error, the original can be found here: http://www.junipersys.com/Juniper-Systems-Rugged-Handheld-Computers/support/Knowledge-Base/Support-Knowledge-Base-Topics/Desktop-Connection-ActiveSync-or-Windows-Mobile-Device-Center/WMDC-in-Windows-10

The solution is a multi-step process:

  1. Ensure that .NET Framework 3.5 is fully installed under Control Panel > Programs > “Turn Windows features on or off”. Sometimes before being successful at installing WMDC, you must first manually enable the required .NET Framework 3.5 under “Turn Windows features on or off” and/or by using the previous dotNetFx35setup.exe installer from Microsoft. You may need to check the http and non-http additions to complete the install.
  2. Run the 64-bit drvupdate-amd64.exe or 32-bit drvupdate-x86.exe installer as an Admin and in “Compatibility Mode” for Windows Vista if WMDC and the required drivers do not successfully install automatically through the Windows Update service when you connect USB.  You can access compatibility mode by right clicking on the file, go to properties, and click the compatibility tab, “Run as Windows Vista”.  Also make sure that you run it as Administrator.   If you do not feel comfortable downloading the files from Junipersys.com you can obtain the files from Microsoft’s website by searching Windows WMDC.
  3. After install and once “Windows Mobile Device Center” appears in the list under the Start menu on the desktop PC, similar to as is automatically applied by our “WMDC-Helper.exe” utility referenced above, you WILL need to run command-prompt as an administrator to apply the following registry commands, and then perform a Restart.
    1. REG ADD HKLM\SYSTEM\CurrentControlSet\Services\RapiMgr /v SvcHostSplitDisable /t REG_DWORD /d 1 /f
    2. REG ADD HKLM\SYSTEM\CurrentControlSet\Services\WcesComm /v SvcHostSplitDisable /t REG_DWORD /d 1 /f
  4. Reboot the machine and you should be able to connect your device and sync with the computer again!

Troubleshooting Linksys LRT214 VPN Router Issues

Troubleshooting a Linksys LRT214:

I recently had to install a Linksys LRT214 Router, the install itself went well but there were a few issues along the way.   One thing I like about the LRT214 VPN Router is that it offers a full client to site VPN Tunnel using IPSEC.  The setup itself was extremely easy and only took a few minutes, the issues arose when the clients started trying to connect to the system as no error was given.

Issue #1:

The first issue was that I was not able to use the existing adapter in the shrew.net vpn client that Linksys recommends per their documentation.  Apparently, in some cases using the existing local adapter can cause the vpn tunnel to loop and therefore fail in establishing a connection.  The recommended setting is to use a virtual adapter and a random address that is outside the range of the network you are connecting too.

Issue #2:

The second issue was far more frustrating.  The tunnel would immediately enable without error but the client would not be able to reach any network resources except the switch itself…  In some cases some network resources would be available but not all.  The first telltale sign was in the logs:

Feb 7 20:07:27 2017    VPN Log    (grpips0)[130] 192.168.2.0/24=== …1.2.3.4===? #248: [Tunnel Established] ISAKMP SA established
Feb 7 20:07:54 2017    VPN Log    (grpips0)[130] 192.168.2.0/24=== …1.2.3.4===?: [Tunnel Disconnected] instance with peer 1.2.3.4 {isakmp=#0/ipsec=#0}

The tunnel is established and the ISAKMP SA is established, but nothing moves… Then the strange thing, one system was able to connect:

Feb 8 06:39:19 2017    VPN Log    (grpips0)[133] 192.168.2.0/24=== …4.3.2.1===? #251: [Tunnel Established] ISAKMP SA established
Feb 8 06:39:23 2017    VPN Log    (grpips0)[133] 192.168.2.0/24=== …4.3.2.1===198.18.0.0/32 #252: [Tunnel Established] IPsec SA established {ESP=>0x06c8fd59 < 0xe0bb64ad NATOA=0.0.0.0}

So why is one connection successfully completing the IPsec SA and the other is not?  The simple answer is its a result of the IP settings on the client network. For example, if the remote network is 192.168.2.0 then the client must be on a separate network, they cannot be on the same subnet.  You can liken it to trying to send a letter from yourself to yourself, the post office will just leave it in your mailbox and it will never go anywhere.

Solution:  Break apart the subnets, regardless of the virtual adapter settings.

Client Network: 192.168.3.0  (Subnet is 192.168.3)

Server Network: 192:168.2.0 (Subnet is 192.168.2)

IPsec will work because when it tries to push the resources for 192.168.2.0 now it won’t conflict with the clients internal network.

Do not have permission to delete file or folder – Windows 10

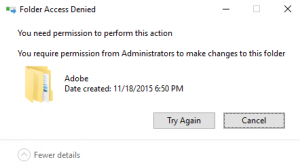
You do not have permission to delete a file or folder in Windows 10

Symptom(s): 

You attempt to delete a file or folder on a Windows 10 drive and receive a permission denied error or that you must get permission from another user in order to delete that file.  Changing the permissions through the Advanced tab on security has no effect.

permission

Solution(s):

  1. Right Click on the folder and Select Properties, then click the “Security Tab” followed by “Advanced
  2. Change the Owner at the top of the Advanced Window to your Windows User Account located at C:\Users
  3. Check “Replace Owner on Subcontainers and objects”
  4. Click Apply, and then click OK two more times and exit the properties window.
  5. Once its applied, go back into properties again, “Security Tab” followed by “Advanced”
  6. Check the box at the bottom of the Window that says, “Replace all child object permission entries with inheritable permission entries from this object”.
  7. Click Apply again.
  8. Click OK two more times and exit the properties window.

You should now have access, this problem can occur from a variety of sources.  One example is when another user on the system creates a directory or file and places restrictions on that file or directory.  Only the security ID that it was created with can access that information unless a user with Administrative authority takes over that file or directory.  Another example is when a user re-installs the Windows operating system or attempts to copy old data from a former Windows install to a new hard drive.  Again, since windows is now a new installation, the security ID information will no longer match and the error will occur.

This error seems to be specific to Windows 7, Windows 8, and Windows 10.  It may occur in Windows Vista as well since that was the first version of Windows to have User Account Control (UAC) enabled in the file system.